Recipe: PCF Cloud Native App
This recipe is based on the PAL Tracker example project.
1. Create the PCF Developer Environment
Developing Spring apps for PAL "the Pivotal way" requires Git, Java 8 or above, IntelliJ, the Cloud Foundry CLI, Gradle, MySQL, and Flyway.
Once the tools are installed, log in to Cloud Foundry (CF):
cf login -a ${CF_API_ENDPOINT}
# ... follow the prompts ...
From there, the CLI can be used to explore the Cloud Foundry environment. Here are a few useful commands:
cf target # View the targeted organization or space
cf apps # List applications in the target CF space
cf services # List services in the target CF space
cf marketplace # List services that can added to the target CF space
Additional information: Platform Acceleration Lab
2. Create a Spring Boot Application
Start with Gradle:
gradle wrapper
touch build.gradle
Open the project in IntelliJ using File > Open rather than the import feature.
In IntelliJ, update the build.gradle file to use the Java plug-in, reference the Maven Central repository, and apply the latest Spring Boot Gradle plug-in:
// Gradle Configuration

buildscript {
	ext {
		// Set Spring Boot version as variable
		springBootVersion = "2.0.6.RELEASE"
	}

	repositories {
		// Use Maven Central to get required packages
		mavenCentral()
	}

	dependencies {
		// Add specified version of Spring Boot to class path
		classpath "org.springframework.boot:spring-boot-gradle-plugin:$springBootVersion"
	}
}

// PAL Tracker Configuration

plugins {
	// It's a Java Project!
	id "java"
}

// Apply the Spring Framework plug-in
apply plugin: 'org.springframework.boot'

repositories {
	// Use Maven Central to get required packages
	mavenCentral()
}

dependencies {
	// Add specified version of Spring Boot to class path
	compile("org.springframework.boot:spring-boot-starter-web:$springBootVersion")
}
Next, create a file settings.gradle to set the name of the Gradle project. This determines the name of the JAR file when the application is built:
rootProject.name = "pal-tracker"Gradle Project Structure
Create a minimal standard Maven directory layout:
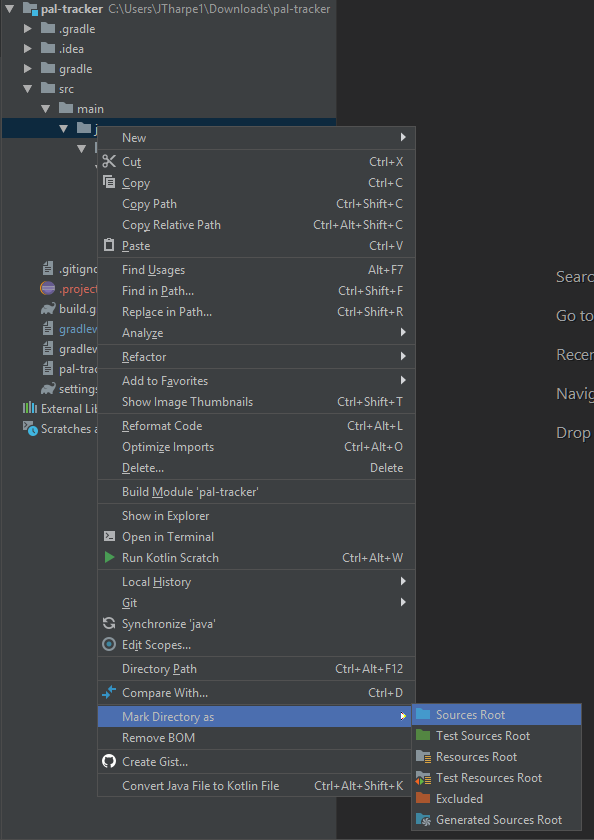
mkdir -p src/main/javaUse IntelliJ to create a new package called io.pivotal.pal.tracker. This might require setting 'src/main/java` as the "Sources Root" first:
With the basic project structure established, we can create a class for our application called PalTrackerApplication:
package io.pivotal.pal.tracker;

import org.springframework.boot.SpringApplication;
import org.springframework.boot.autoconfigure.SpringBootApplication;

// Tell Spring Boot that this is our main entry point
@SpringBootApplication
public class PalTrackerApplication {

    public static void main(String[] args) {
        // Start the app
        SpringApplication.run(PalTrackerApplication.class, args);
    }

    // Later: Register beans with @Bean
}
The @SpringBootApplication annotation tells Spring Boot that this class contains the main entrypoint of the application. The call to SpringApplication.run(...) is boiler-plate to tell Spring to scan for the necessary components that will be injected into the controllers and other classes that make up the application.
It's now possible to run the application, though you'll receive the generic Spring Boot Whitelabel Error Page.
To make running the application, and later tests, easier you can delegate these actions to Gradle in IntelliJ under File > Settings > Build, Execution, Deployment > Gradle > Runner:
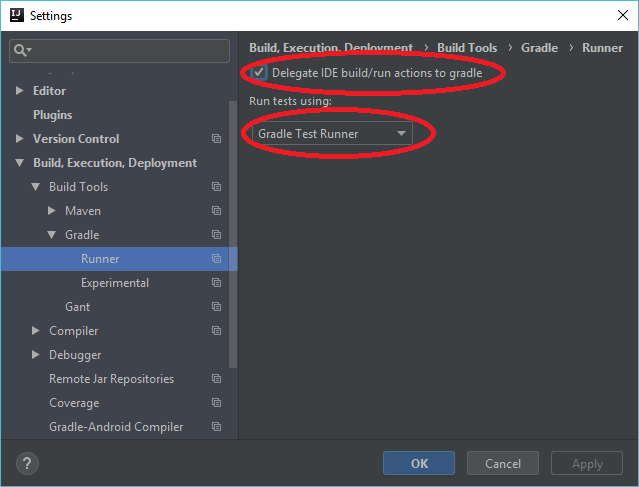
Create a REST Controller
With the basic project structure in place, we can create a simple REST controller by generating a new Java class and annotating it:
package io.pivotal.pal.tracker;

import org.springframework.web.bind.annotation.GetMapping;
import org.springframework.web.bind.annotation.RestController;

// Tells spring that this controller provides REST end-points
@RestController
public class WelcomeController {

    // Maps "GET" requests to the application root
    @GetMapping("/")
    public String sayHello() {
        return "hello";
    }
}
When the application is run and launched in the browser, the "hello" string is returned.
3. Push to Cloud Foundry
Build and deploy the application to Cloud Foundry:
./gradlew build # build the JAR
cf push -p build/libs/pal-tracker.jar # deploy to CF
Get the application status:
cf app pal-tracker # Get application statusGet recent log output from the app:
cf logs --recentThe output of cf push will include a URL. Opening the URL in a web browser should bring up the application.
Broader Topics Related to Deploy Spring Boot Apps to Pivotal Cloud Foundry (PCF)

IntelliJ IDEA
IntelliJ IDEA IntelliJ IDEA is a Java IDE, developed by JetBrains .
Java
A cross-platform, object-oriented programming language
Spring Boot
A Java framework for developing REST APIs
PAL Tracker (Example Java Application)
An example application to demonstrate application deployment and management strategies in Java, Spring Boot, and Cloud Foundry
Cloud Foundry
An open-source, on-premise cloud platform for enterprise IT organizations