Arduino Thermostat
This Arduino Uno based thermostat provides an LCD Display of current and target temperature, plus temperature control and measure toggle (fahrenheit/celsius) through toggle switches.
It works by activating one relay when the temperature is too low, and another relay when the temperature is too high. When building the project, use LEDs in place of the relays for easy testing.
Thermostat Parts
| Part | Quantity |
|---|---|
| Arduino Uno | 1 |
| Breadboard | 1 |
| 16x2 LCD | 1 |
| Potentiometer | 1 |
| Momentary switches | 3 |
| 10k Ω resistors | 3 |
| 5V Relays | 2 |
| DHT11 temperature & humidity sensor | 1 |
| Jumper wires | Several |
Hardware Build
The instructions will be confusing if you do not reference the following wiring diagram!
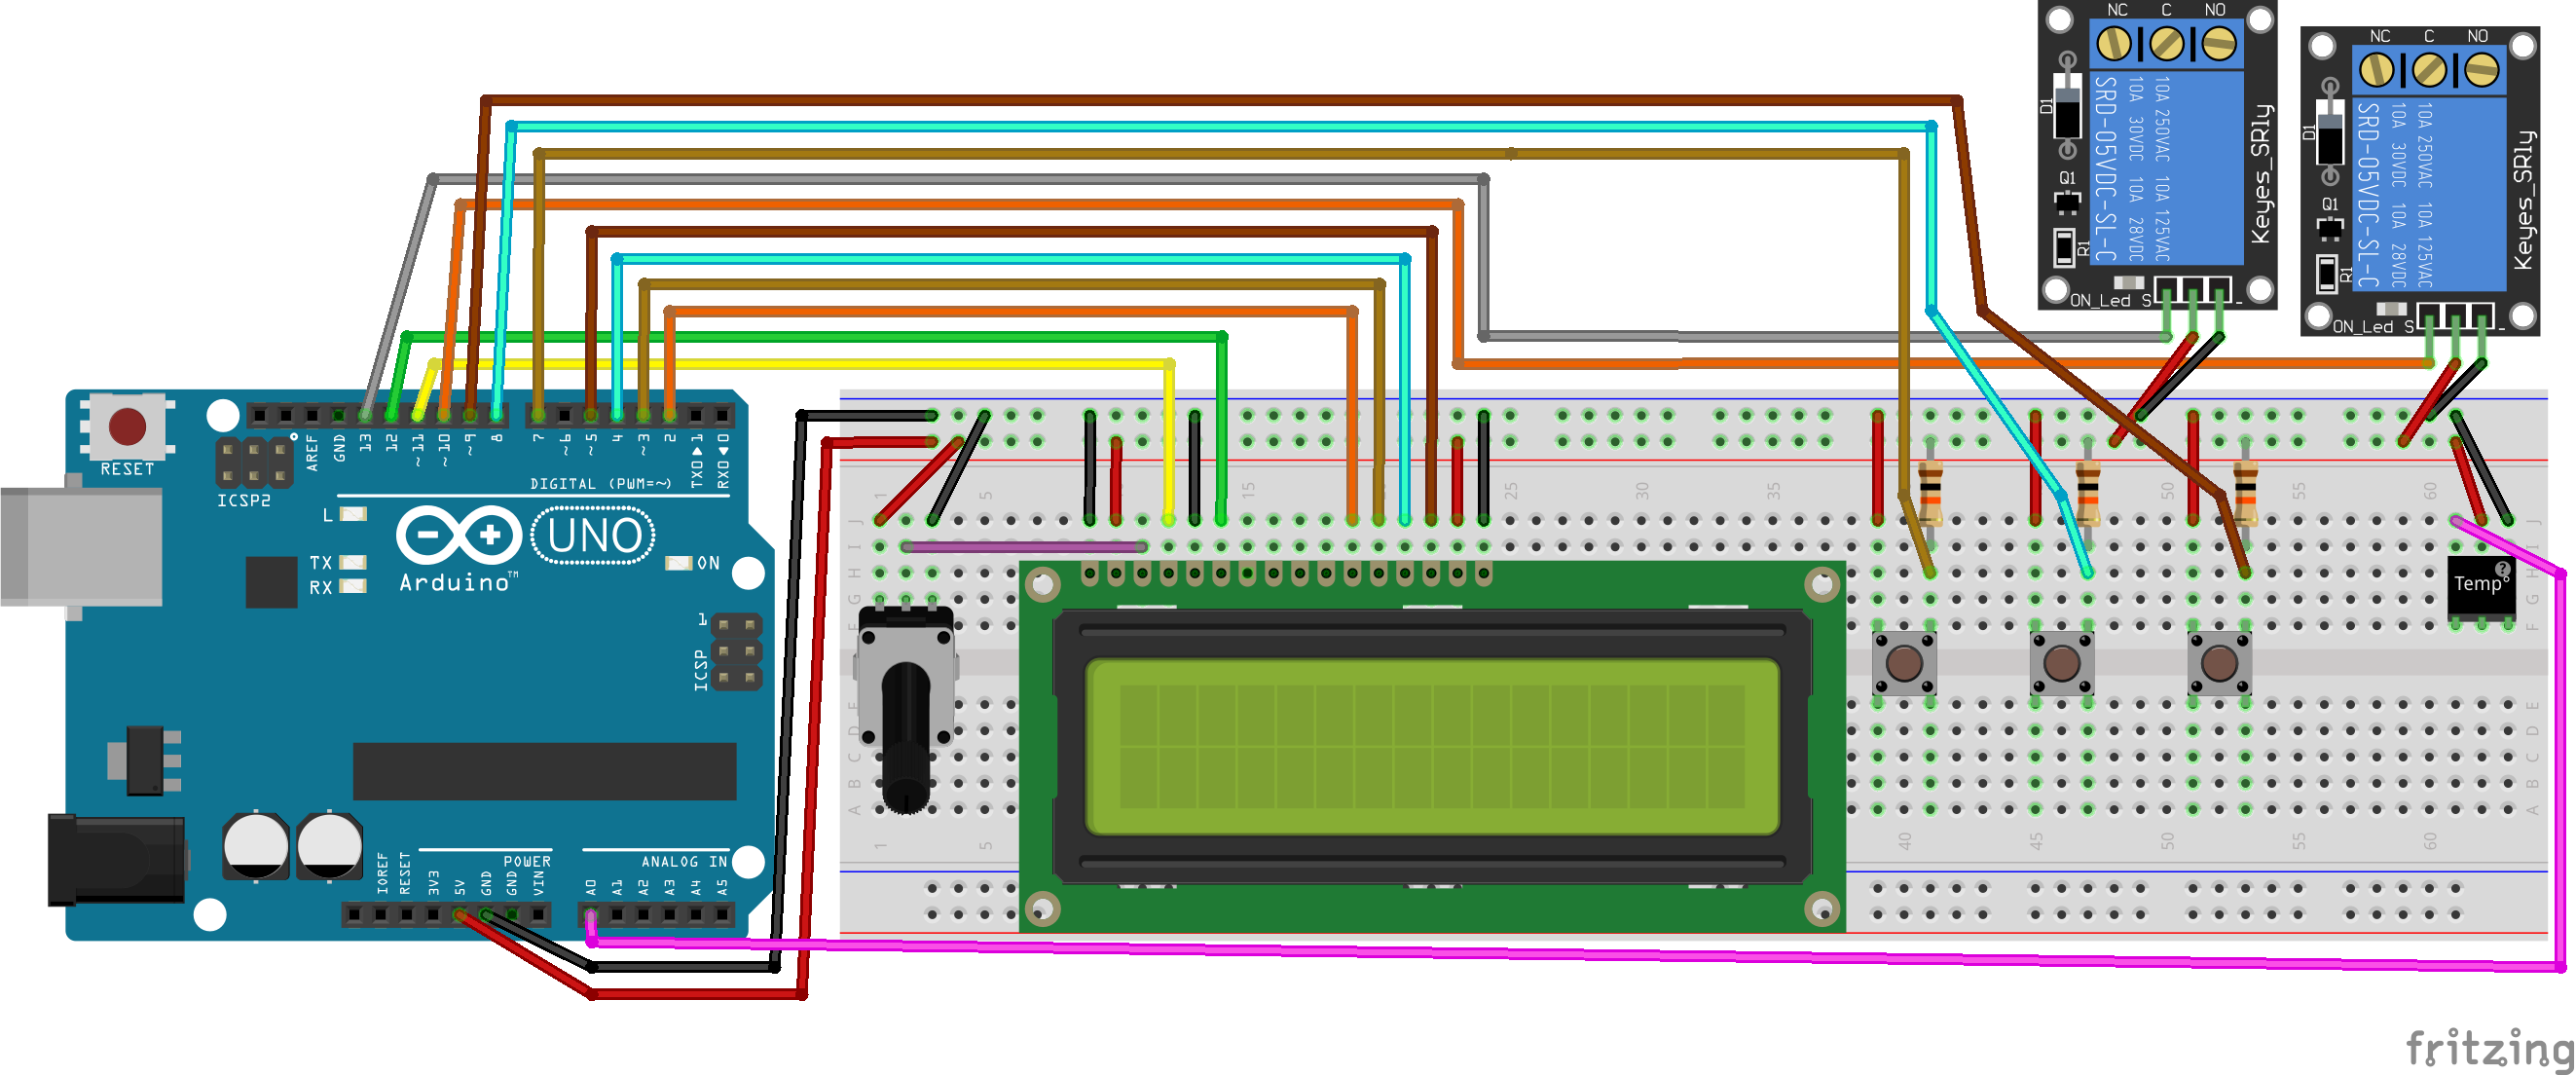
1. Connect the LCD to the breadboard
Note, some of the pin designations may differ between brands.
| LCD Pin | Destination |
|---|---|
VSS | Breadboard ground rail (-) |
VDD | Breadboard power rail (+) |
VO | Potentiometer wiper (middle pin) |
RS | Arduino pin 11 |
RW | Ground rail (-) |
E | Arduino pin 12 |
D4 (sometimes DB4) | Arduino pin 2 |
D5 (sometimes DB5) | Arduino pin 3 |
D6 (sometimes DB6) | Arduino pin 4 |
D7 (sometimes DB7) | Arduino pin 5 |
A (sometimes LED+) | Breadboard power rail (+) |
K (sometimes LED-) | Breadboard ground rail (-) |
2. Connect the potentiometer
Seat the potentiometer in the breadboard. Connect outer pins of the potentiometer to the power and ground rails of the breadboard. The wiper pin (in the middle) will connect to the LED VO pin.
3. Connect the momentary switches
Seat each momentary switch in the breadboard, then connect one pin of each switch to the breadboard power rail (+) and the other to the breadboard ground rail (-) with a 10K Ω resistor. Finally, connect each ground pin to the Arduino according to its purpose:
| Purpose | Arduino Pin |
|---|---|
| Temperature up | 7 |
| Toggle celsius/fahrenheit | 8 |
| Temperature down | 9 |
4. Connect the Temperature & Humidity Sensor
Seat the temperature & humidity sensor in the breadboard, then connect the ground and power pins to the ground and power breadboard rails, respectively. Connect the signal pin to the Arduino A0 pin.
5. Connect the Relays
Connect the ground and power pins of each relay to the ground and power breadboard rails, respectively. Finally, connect each relay's signal pin to the Arduino according to its purpose:
| Purpose | Arduino Pin |
|---|---|
| Heating | 13 |
| Cooling | 10 |
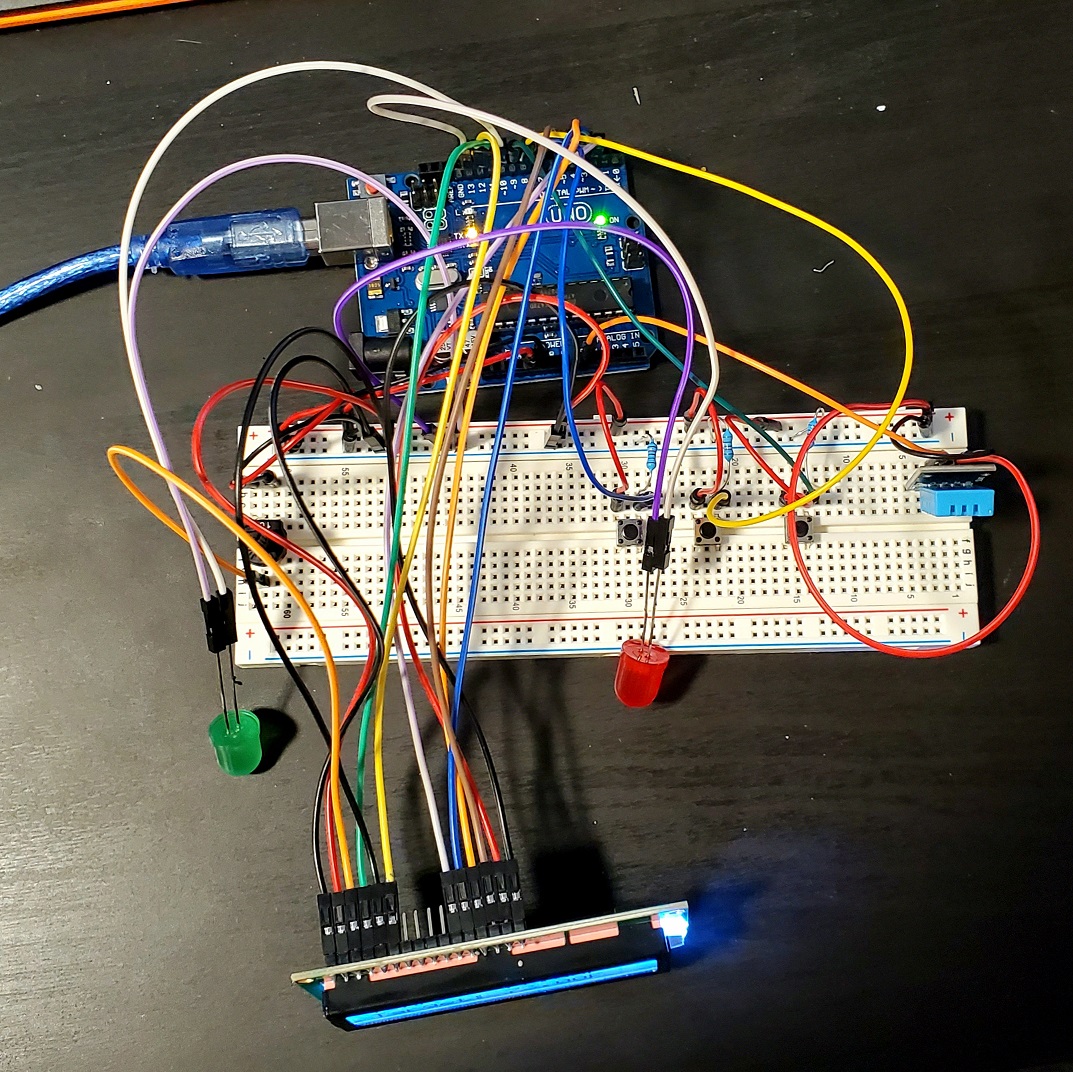
6. Check connections
Ensure each connection is secure. The final build should look something like this (note: LEDs used as a stand-in for the relays).
Write the Software
1. Import the DHT library
The DHT library is not available by default. To install it, navigate in the Arduino IDE to Tools ➡ Manage Libraries... then search for "DHT sensor library" and install it.
2. Write (or copy & paste) the code
Here is the full, annotated code for the thermostat:
// written by Dylon Jamna, modified by Micah Beeler, further modified by James Tharpe
// Original code: https://pastebin.com/HKbJjKxE
// Original instructions: https://www.instructables.com/Arduino-Thermostat/

#include <LiquidCrystal.h>
#include <DHT.h>

// Sensor Configuration: Should map to temperature & humidity
// sensor connections to the Arduino
const int
	DHT_PIN = A0,
	DHT_TYPE = DHT11;

DHT sensor(DHT_PIN, DHT_TYPE);

// LCD Configuration: Should map to temperature & humidity
// sensor connections to the Arduino
const int
	LCD_PIN_RS = 11,
	LCD_PIN_EN = 12,
	LCD_PIN_D4 = 2,
	LCD_PIN_D5 = 3,
	LCD_PIN_D6 = 4,
	LCD_PIN_D7 = 5;

LiquidCrystal lcd(
	LCD_PIN_RS,
	LCD_PIN_EN,
	LCD_PIN_D4,
	LCD_PIN_D5,
	LCD_PIN_D6,
	LCD_PIN_D7);

// Button configuration
const int
	DECREMENT_BTN_PIN = 7,
	TOGGLE_BTN_PIN = 8,
	INCREMENT_BTN_PIN = 9;

// "Heater" and "cooler" configuration
const int
	HEATER_PIN = 13,
	COOLER_PIN = 10;

// Controls
bool useFahrenheit = true;
int targetF = 72, targetC = 22;

void setup() {
  // Serial (for logging)
  Serial.begin (9600);
  Serial.print("setup()\n");

  // Sensor
  sensor.begin();
  Serial.print("\tsensor initialized\n");

  // LCD
  lcd.begin(16, 2);
  lcd.setCursor(0, 0);
  lcd.clear();
  Serial.print("\tLCD initialized\n");

  // Buttons
  pinMode(INCREMENT_BTN_PIN, INPUT);
  pinMode(DECREMENT_BTN_PIN, INPUT);
  pinMode(TOGGLE_BTN_PIN, INPUT);
  Serial.print("\tButtons initialized\n");

  // Temperature Controllers
  pinMode(HEATER_PIN, OUTPUT);
  pinMode(COOLER_PIN, OUTPUT);

  Serial.print("setup() DONE\n");
}

void loop() {
  Serial.print("loop()\n");

  // Read Button State
  bool incrementTarget = digitalRead(INCREMENT_BTN_PIN);
  bool decrementTarget = digitalRead(DECREMENT_BTN_PIN);
  bool toggle = digitalRead(TOGGLE_BTN_PIN) == HIGH;
  bool wait = incrementTarget || decrementTarget || toggle;

  // Configure
  if(toggle) useFahrenheit = !useFahrenheit;
  if (incrementTarget) { targetF++; targetC++; }
  if (decrementTarget) { targetF--; targetC--; }
  const char symbol = useFahrenheit ? 'F' : 'C';
  const int target = useFahrenheit ? targetF : targetC;

  // Read Sensor Data
  float temperature = sensor.readTemperature(useFahrenheit);
  float humidity = sensor.readHumidity();
  Serial.print(
		"\t" + String(temperature) + "°" + symbol +
		", Relative Humidity " + String(humidity) +
		"% \n");

  // Write out to LCD
  lcdWrite(0, "Temp:   " + String(temperature) + symbol);
  lcdWrite(1, "Target: " + String(target) + ".00" + symbol);

  // Activate Temperature Control
  if(round(target) > round(temperature)) digitalWrite(HEATER_PIN, HIGH);
  else digitalWrite(HEATER_PIN, LOW);

  if(round(target) < round(temperature)) digitalWrite(COOLER_PIN, HIGH);
  else digitalWrite(COOLER_PIN, LOW);

  // Pause to allow finger to lift from button(s)
  if(wait) delay(500);
}

// Utility to simplify writing to LCD
void lcdWrite(const bool line, const String& text){
  lcd.setCursor(0, line);
  lcd.print(text);
}
Connect the Arduino to you computer and click the Upload button to deploye the code to the Arduino.
3. Test it out!
You should be able to view the current temperature, adjust the target temperature up and down, switch between celsius and fahrenheit, adjust the brightness of the LED, and see the heating and cooling functions come on based on the difference between the current and target temperatures.
Here's a video of the thermostat in action:
Credit
This project is adapted from the Arduino Thermostat by Micah Beeler.
Articles that Helped
Broader Topics Related to Arduino Thermostat

Relays
Learn about relays
Arduino 16x2 LCD
How to use the popular 16x3 LCD included with many Arduino kits
Arduino Uno
The open-source electronics platform for interactive projects and prototypes